
Pick up your inflatable on Friday and bring it back on Monday. Play the whole weekend!
Pick-up Special is a way for you to get your inflatable for longer or for a cheaper price. Please remember that you will need to be able to set it up (with our directions) and take it back down (fold/roll) by yourself or with friends and family.
If we must pick the unit up we will charge extra for labor and gas.
ALL setup safety procedures will need to be followed, and the renter will sign a liability waiver when the unit is picked up. The waiver also covers the renters monetary risk of a soiled unit (silly string, gum, gravel, etc), or if repairs need to be made to the inflatable (we inspect/clean every time they come back).
NO SILLY STRING OR GLITTER. If Unit is returned with any silly string, you are responsible for the damage and cleaning fees. Silly String can potentially ruin the entire inflatable.
Turn off your sprinklers where the unit is placed. If a dry unit comes back wet there will be a $40 clean and dry charge. If you have rented a wet capable inflatable it is a good idea to dry it out before you fold and roll it.
If you elect to use your own electrical cord, it must be 14 gauge or bigger. Using a smaller cord will burn up the blower motor.
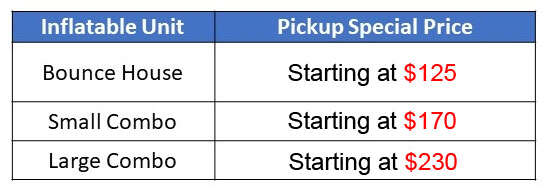
To qualify for this special, you must have the following:
Credit Card to cover deposit.
Access to a pickup, SUV or trailer that is capable of carrying the unit that you have selected to rent. Bounce Houses will fit in most SUV's, and combos and water units can fit in pickups and trailers.
Access to a cart or dolly that is capable of carrying the unit that you have selected.
The availability of someone in your party that is capable of folding/rolling/loading the unit.
Items Included:
Inflatable Unit
Blower
Stakes
Extension Cord (if needed)
Charge for lost items:
Inflatable Unit = Cost to replace that unit ($1500 - $5000)
Blower = $225
Stakes = $1.50
Extension Cord = $50
SETUP
In general, determine the best path to the set-up location, and check out the location to make sure it is appropriate. Always attempt to put the unit on grass if possible, but if not possible make sure to put a tarp down before placing the inflatable. If setting on a hard surface, sand bags or other forms of anchor must be used. Sand bags can be provided when you are picking up the inflatable.
Pay attention to surface type and slope, and make location determination based on how level the surface is.
Try to keep the location within 100 feet (length of the electrical cords) of the electrical outlet (patio location). It's not good on the blowers to go further than this distance and inflatable may not inflate properly.
Always look over head for trees or cables as well. The units range in height, so check and make sure there is plenty of clearance for height as well as around the unit. There should be a minimum of 2 feet all the way around the unit. Do not force it, you will be responsible for any damage to the inflatable.
If there is a dog, remove the dog from the area before setting up the unit (dog react differently to inflatables, and you will be responsible for any damage). Make sure the set up and surrounding area is free from dog poop.
If using a cart, it is recommended to pull the cart backwards when going over curbs or through gates (or along any tight pathway). This helps protect the unit at all times and ensures that it doesn't get snagged on anything (you are responsible for any damage to the inflatable).
If the cart/unit won't fit through the gate, find an alternate route to the set-up location that is safe for the unit.
When you arrive at the set-up location, position the unit in the area so that it will unroll/unfold and be in position (you won't want to drag the unit around). If you are unsure how the unit will unroll/unfold, check out the roll instructions document for that particular unit style.
Always try to position the unit with the load ramp facing the party gathering, and the blower on the far side of the unit to reduce noise.
Unroll/Unfold the unit and make sure that the final location is the same as you expected it to be.
Return to the set-up location with the following:
Electrical extension cord
Blower
Stakes
Run the extension cord from a suitable electrical outlet (most houses have them located on the back patio), making sure to route the cord around potential party gathering areas. Make sure there are no potential trip hazards from this electrical cord. Run it around the inflatable unit to the blower and plug it in.
Set-up the Unit:
Connect the tube from the inflatable unit to the output of the blower. Make sure it is tight and there is tube material under the strap all the way around the output. Make sure the is no way that this tube will slide off the blower output.
If there is another tube on the inflatable, wrap the tie down around it and close if off securely, then check the unit for zippers (some units have up to 3 zippers) and make sure they are all closed with the Velcro flap closed as well.
At this time, the unit should inflate when you turn the blower power switch to ON. After it is fully inflated make sure that it is still clear of all obstacles, and put stakes on the unit at EVERY corner. Even if there is no wind, it is important to stake every corner because the wind could pick up later. Stakes need to be hammered in at a 45 degree angle and hammered all the way into the grounds so that the only part of the stake showing is the bend in the stake.
SAFETY ISSUES DURING SETUP
Always put 4 stakes or 4 sandbags on the inflatable, as if the wind is blowing or kicks up later this will hold it down up to 15mph.
Make sure ALL the zippers are shut so the unit doesn't get soft or blowout later. If the Velcro blows out later the unit will crash quickly and without enough warning for the kids to get out of the inflatable.
Make sure that the tube attached to the blower is straight and plenty of material is past the strap, and make sure the strap is well behind the end of the blower and very tight so it doesn't come off while the kids are jumping. If the tube comes off the inflatable will collapse quickly and not allow the kids enough time to vacate the inflatable.
Make sure that the inflatable is on level ground, as the unit will move while the kids are jumping and pull the tube off the blower (quickly collapsing the inflatable).
Make sure that you route the electrical cord to the blower safely. Make sure to route behind and around any high traffic areas, and put under a rug or something by doors if possible.
TAKE DOWN
Take the cart/dolly and follow the best path to the unit.
Before turning the power switch on the Blower to off, make sure that everyone is clear from the unit (and out of the unit).
Turn Blower off and unplug electrical cord.
Folding/Rolling the Unit:
Pull the stakes out of the ground, should be one at each corner.
Disconnect the tube to the inflatable unit from the output of the blower.
Open any zippers to help evacuate the air.
At this time, the unit should deflate. After it is fully deflated you can fold and roll the unit in accordance with the roll procedure for that specific unit. There should be no material showing from the visible (when inflated) part of the unit, as the only material showing when correctly rolled should be the bottom of the unit (Important).
Load the Unit back into the delivery vehicle being careful not to hook it on anything. Load blower, stakes, and extension cord (if provided by us) and put them in your return vehicle. Do not leave anything behind! You are responsible for any items not returned.
Make sure Idaho Inflatables knows what time you are returning the inflatable. We do not have set warehouse hours and would need to make sure someone from our company is available to help unload.
Thank you for renting with Idaho Inflatables!
